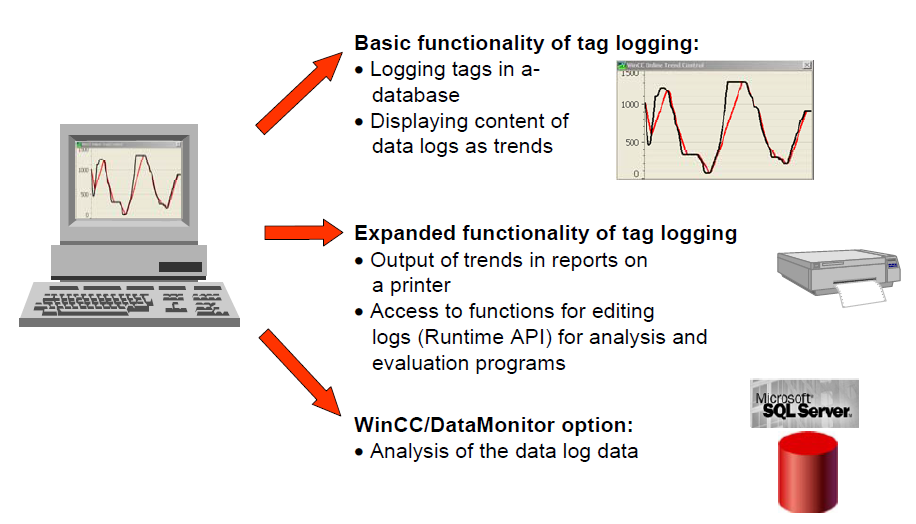
Purpose
1.Saving current tag values in a database for display with the WinCC trend view and for later analysis.
2. Depending on the configured acquisition mode, the current tag value is entered with the associated time stamp in a database
3.Acquisition modes: on demand, on change, cyclic and cyclic selective.
4. Dead band: Process values outside the dead band are not logged.
For a data log, the storage location must be specified; in other words, whether data is stored on the hard disk or in main memory.
In contrast to storage in the logging database, process values logged in main memory are only available for as long as Runtime is active. Storing in main memory has the advantage, however, that the values can be written and read out very quickly.
Types of process value logging
When you configure logs, the system distinguishes between the following log types:
Process value log
Stores process values in logging tags. When configuring the data log, the process tags to be logged and the storage location must be selected.
Compressed log
Compresses logging tags from tag logs. The compressed log can also further compress existing compressed logs. During configuration of the compressed log, a calculation method and the compression period need to be selected.
Procedure for configuring data logs
In the “Logging” area navigation in the runtime settings, you configure the logging settings for the fast and slow data logs (tag logs). Here, you specify the period for which the data of “fast data log and slow data log” are logged and the point in time as of which the data can be overwritten. In addition to this, the backup function is also enabled here and the path for swapping out the log segments for backup is entered.
The procedure for the configuration of a tag log consists of the following steps:
- Go to → > Project tree > HMI device > Historical data > Data logs tab
- Create new tag log and select storage location. (By clicking on the entry in an empty table row, a new log is inserted in the configuration. Following this, the log name and storage location for example “Database” and the status at the start of runtime must be selected.
- Select the tags for logging.
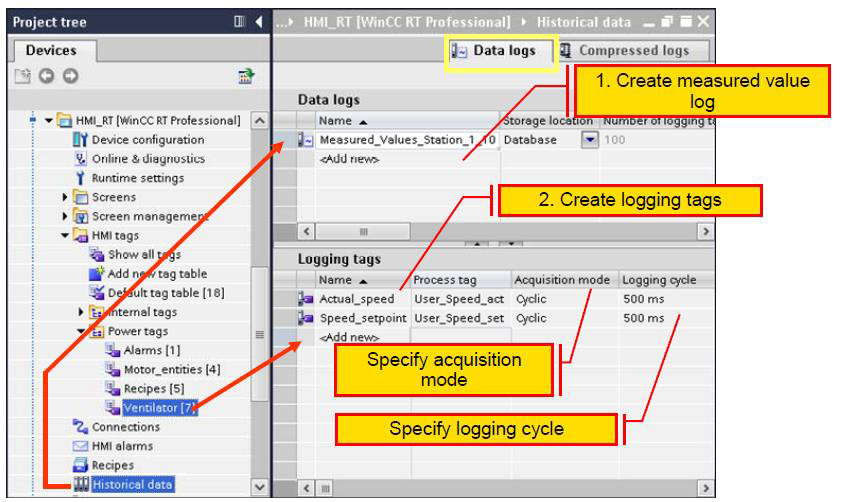
- Inspector window > Properties tab (Properties) > General:
o Name: Specify the log name
o Storage location / Storage location: e.g. select “Database”.
o Status: Disable the “Locked” option so that logging is enabled when runtime starts.
As an alternative, the properties of a log can be configured directly in the table of the “Data logs” editor. Columns that are not displayed can be shown using the shortcut menu of the column title.
Properties of the process value
Use the following settings for the WinCC value table (Properties page):
General / Display:
Inspector window > Properties tab + Properties > General > Display
Data source: f (t) trend view_1
Mode: Ruler
Automatic: enable
Layout / Position & size:
- Inspector window > Properties tab+ Properties > Layout > Position & size X: 150, Y: 430, width: 1020 and height: 320
Window / Settings: - Inspector window > Properties tab+ Properties > Window > Settings
- Title style: “Default”
- Title: “Blast furnace-W.”
- Moveable, Closable: Sizeable: deactivated
Table: - Inspector window > Properties tab+ Properties > Table
- Column headers: Show column headers: enabled
- Row headers: Show row headers: activated
Blocks: - Inspector window > Properties tab+ Properties > Blocks >
- Length for X value/time stamp under Blocks": set to 28
Columns: - Inspector window > Properties tab+ Properties > Columns >
- Columns: - Y value and X value/ time stamp: enabled
Toolbar: - Inspector window > Properties tab+ Properties > Toolbar >
General: - Toolbar / Show tooltips
- Buttons:
o Adopt defaults - enable all buttons - Status bar:
o Inspector window > Properties tab+ Properties > Status bar > - Status bar - General:
o Display status bar/ Show tooltips activated - Status bar - Elements:
- Show all elements