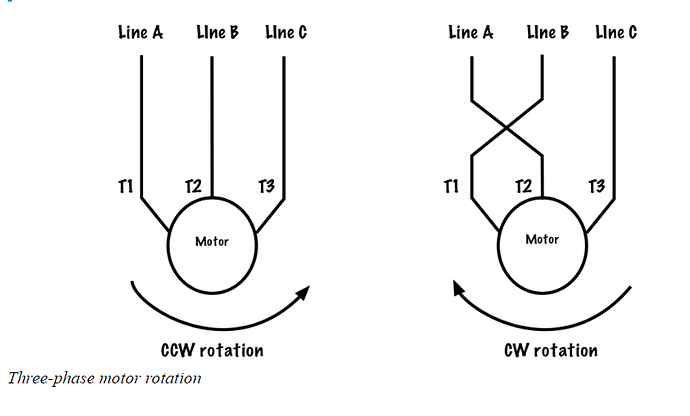
If a three-phase motor is to be driven in only one direction, and upon its initial energization it is found to be rotating opposite to what is desired, all that is needed is to interchange any two of the three line leads feeding the motor. This can be done at the motor starter or at the motor itself.
Once two of the lines have been switched, the direction of the magnetic fields created in the motor will now cause the shaft to spin in the opposite direction. This is known as reversing the phase rotation.
Reversing Magnetic Starters
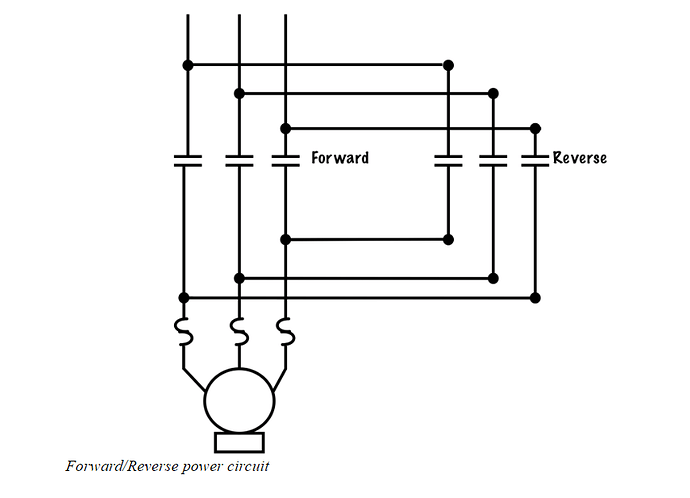
If a motor is to be driven in two directions, then it will require a Forward / Reverse motor starter, which has two three-pole horsepower-rated contactors rather than just one as in the conventional starter. Each of the two different motor starters powers the motor with a different phase rotation.
When the forward contactor is energized, power contacts connect line L1 to T1, line L2 to T2 and line L3 to T3 at the motor. When the reverse contactor is energized, the power contacts connect line L1 to T3, line L2 to T2 and line L3 to T1 at the motor.
Since the two motor starters control only one motor, only one set of overload relay heaters need be used. The return paths for both starter coils connect in series with the normally closed contacts of the overload relay so that if an overload occurs in either direction, the starter coils will be de-energized and the motor will come to a stop.
Note that the two contactors must be electrically and mechanically interlocked so that they cannot be energized simultaneously. If both starter coils became energized simultaneously, a short circuit will occur with potentially hazardous results.
Forward / reverse starters will come with two sets of normally open auxiliary contacts to act as holding contacts in each direction. They will also come with two sets of normally closed auxiliary contacts to act as electrical interlocks.
Mechanical Interlocks
Forward / reverse starters must never close their power contacts simultaneously. The best way to provide this is through electrical interlocks, which prevent the one coil from being energized if the other is engaged. A failure in electrical interlocking can cause both coils to be energized at the same time.
If both become energized, some form of mechanical interlock is required to prevent both armatures from pulling in. Represented on schematic diagrams as a dotted line between the two coils, a mechanical interlock is a physical barrier that is pushed into the path of one coil’s armature by the movement of the adjacent coil. This means that even if both coils are energized, only one armature will be able to pull in fully. The coil that is prevented from pulling in will make a terrible chattering sound as it tries to complete the magnetic circuit.
Mechanical interlocks should be relied on as a last resort for protection.
Electrical Interlocks
Electrical interlocking is accomplished by installing the normally closed contact of one direction’s coil in series with the opposite direction’s coil, and vice versa. This ensures that when the forward coil is energized, pushing the reverse pushbutton will not energize the reverse coil. The same situation is in effect when the reverse coil is energized. In both situations the stop button will need to be pressed to de-energize the running coil and return all its auxiliary contacts back to their original state. Then the opposite direction coil can be engaged.
Reversing Control Circuit
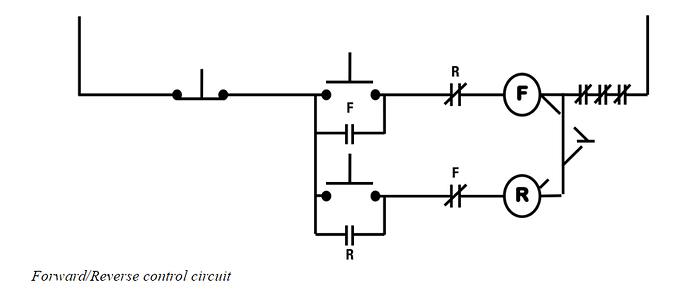
When designing the control schematic for forward / reverse circuits, we start with the standard three-wire circuit, add a second normally open pushbutton, and add a holding contact branch for the second coil. A single stop button is sufficient to disable the motor in both directions.
The two coils are mechanically interlocked and the normally closed instantaneous contacts provide electrical interlocking.
If the forward pushbutton is pressed, as long as the reverse coil is not engaged, current will find a path through the normally closed reverse contact and energize the forward coil, causing all contacts associated with that coil to change their state. The 2-3 holding contact will close and the normally closed electrical interlock will open. If the reverse pushbutton is pressed while the forward coil is engaged, current will not be able to get past the forward normally closed contact, and nothing will happen.
In order to send the motor in the reverse direction, the forward coil must be de-energized. To do this, the stop button must be pressed, then the reverse pushbutton will be able to energize the reverse coil.
Regardless of the direction the motor is spinning in, this circuit will operate as a standard three-wire circuit providing low-voltage protection (LVP) until either the stop button is pressed, or an overload occurs.
Pushbutton Interlocks
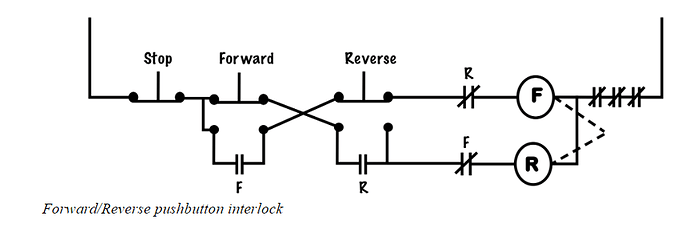
Pushbutton interlocking requires the use of four-contact momentary push buttons with each pushbutton having a set of normally open and normally closed contacts.
To achieve pushbutton interlocking, simply wire the normally closed contacts of one pushbutton in series with the normally open contacts of the other pushbutton, and the holding contacts will be connected in parallel with the appropriate button’s normally open contacts.
This circuit still requires the installation of electrical interlocks.
Pushbutton interlocking doesn’t require the motor coils to be disengaged before reversing direction because the normally closed forward contacts are in series with the normally open reverse contacts, and vice-versa. Pushing one button simultaneously disengages one coil while starting the other. This sudden reversal (plugging) can be hard on the motor, but if quick reversal of the motor is required, this circuit can be a solution
Reference
Basic Motor Control by Aaron Lee and Chad Flinn is used under a CC BY 4.0 Licence.


